How to Merge Your Database with Google Maps and Make Pop-Bys a Breeze
- Published on
-
 Matt McGee Editor, Agent Resource CenterClose
 Matt McGee Editor, Agent Resource Center
Matt McGee is HomeLight's Agent Resource Center managing editor. He hosts HomeLight's weekly podcast, The Walkthrough, which delivers actionable, no-hype advice from the best real estate agents and top industry experts in the country. He previously served as Editor-In-Chief for three Third Door Media digital publications: Search Engine Land, Marketing Land, and MarTech Today. Matt's a Pepperdine University grad who's been surrounded by real estate his entire life: his wife and sister are active agents, as was his dad for almost 50 years.
You know that it’s a Good Thing to stay in touch with your sphere.
You know the more touches you get with them, the more likely you’ll stay top-of-mind when they need a real estate agent or when they know someone who does.
Pop-bys are a proven way to get face-time with your sphere, but scheduling visits is a challenge. If you have a big circle of influence (COI), you could easily spend all day — or several days — knocking on their doors and still only say hello to a small fraction of people. And don’t forget about all the planning involved! To do it efficiently, you’ll have to coordinate your itinerary to identify people in close proximity to one another so you can see more of your contacts in less time.
Or you can make it easier by merging your contacts database with Google Maps. (#mindblown)
Once you do this (see the instructions below), pop-bys become a breeze. Whenever you have an extra 10 minutes around town, you can fire up your smartphone, open up Google Maps to see who from your sphere is nearby, and surprise them with a quick visit — no planning required.
Dan Evans, a top agent in Provo, Utah, says this “allows me to give an extra touch to my database as I’m getting ready for my meeting, as well as further establish me as an expert in their area. This small change has been huge for my business.” Dan shared this tip with HomeLight after he learned it from a California-based agent whose name he can’t remember. (If you’re out there, or you know who the source is, please get in touch so we can give appropriate credit.)
If this sounds like something you want to do to make it easier to stay in touch with your sphere, follow the instructions below. It gets a bit technical, so don’t feel bad if you need to ask for help. It’s worth the effort — once you create your map and load it in Google Maps, you’ll have an instant system for getting more touches with the contacts in your database.

How to Create a Custom Google Map of Contacts in Your Real Estate Database
1. Export your database contacts.
In your customer relationship management (CRM) platform, export your contacts’ names, addresses, phone numbers, and email addresses. Save this as a CSV (.csv) file. Important: Google only allows 2,000 contacts per custom map, so if you have more than that, try to export your contacts based on where they live. Then you’ll be able to create different custom maps for the different towns where you have contacts.
2. Sign-in to your Google account.
Sign-in with the Google/Gmail account that you want connected to the custom map you’re going to create. It’s okay to use your individual Google account — you’ll be able to share the map later (if you want) with an assistant or peer without giving them complete access to your account.
3. Go to Google Maps and begin to make your custom map.
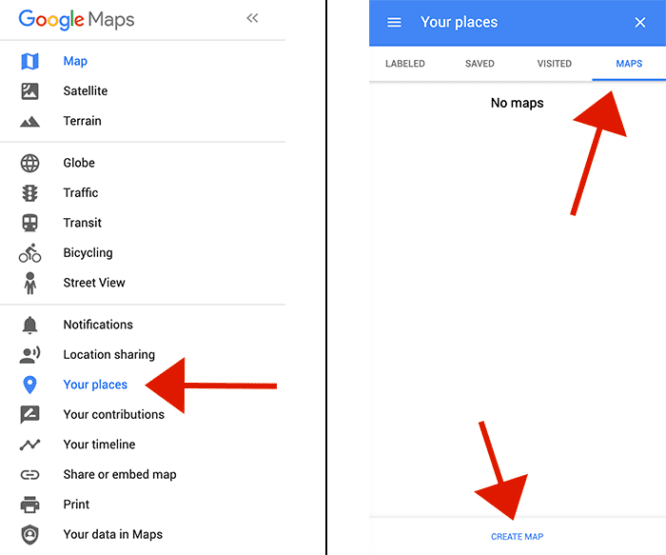
Once you’re logged in, go to Google Maps on your desktop web browser. (Note: You can’t make the custom map in the Google Maps mobile app on your smartphone. But you’ll be able to access it from your phone after it’s created.) To the left of the search bar, you’ll see three horizontal lines representing the navigation menu. Click those horizontal lines, then find “Your places” and click that. Then look for “Maps” and click that. At the bottom of the screen, you should see a “Create Map” link. Click that. (See below.)
4. Create your custom map with your database contacts.
Here’s where it gets specific.
a) When creating your map, give it a descriptive name like CITYNAME Sphere or CITYNAME COI — i.e., Provo Sphere.
b) Click the “Import” link and upload the CSV file you made in Step 1.
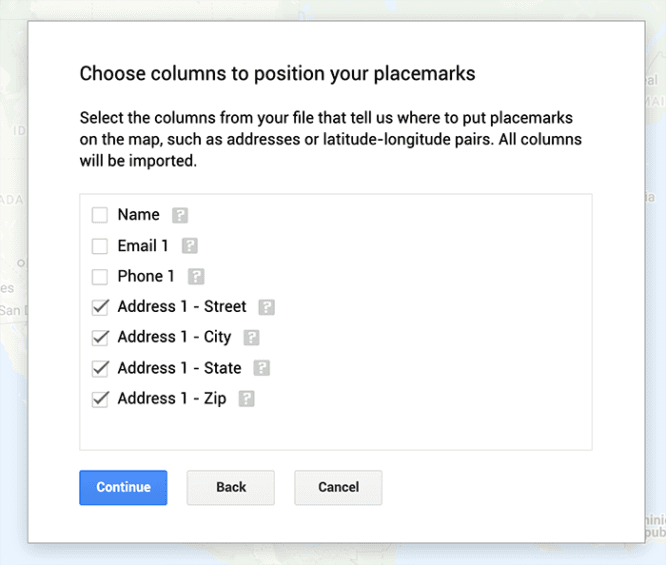
c) A checkbox menu will come up that says “Choose columns to position your place marker.” Check only the boxes for street address, city, state and ZIP — that’s how Google is going to position the pins with your contacts’ information. (See below.)
d) The next checkbox asks you to “choose a column to title your markers.” Choose “name” so that when you scroll over the pin on your map, it’ll show their name. (And you can click the pin for the rest of their details.)
e) Click the “Finish” button.
You’re done! At this point, you’ve created your custom map and Google should save it automatically to your account. If you exported more than one CSV file, repeat the steps above to load each file and create a separate custom map for each set of contacts.
Now you need to know how to call it up on your smartphone while you’re around town.
How to Use Your Custom Google Map of Contacts
This process is similar to what you just did, except you’re on a smartphone and you won’t be creating a new map.
1. Open the Google Maps app.
2. Click the horizontal lines to the left of the search bar.
3. Click on “Your places” then click on “Maps.” You should see your custom map(s) there.
4. Click the name of the map you want to use.
Your map should load automatically on the map, with a separate pin for each contact. Touching any pin should give you the contact’s name and contact info, making it easy for you to find nearby members of your sphere/circle of influence whenever you’re out in the field!
When you’re finished using the custom map and want to close/hide it, the steps will depend on the device you use. See Google’s instructions for Android, iOS, and desktop, too.
Thanks to Dan Evans for sharing this tech tip with us! If you have a tech tip to share with your industry peers, email us at tips [at] homelight.com anytime, or message us on social media: Facebook / LinkedIn / Twitter.
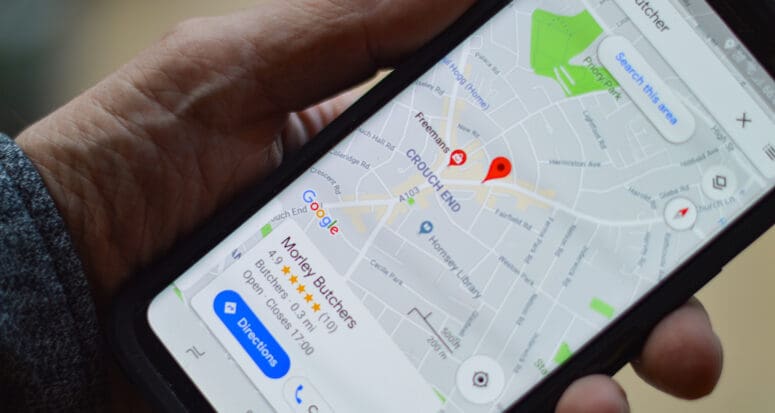
Header Image Source: (Henry Perks / Unsplash)
All product names, logos, and brands are property of their respective owners. All company, product and service names used in this website are for identification purposes only. Use of these names, logos, and brands does not imply endorsement or any affiliation with HomeLight.


